Creating an Interactive 360° Project in Cinema8
Login to Cinema8 Creative Studio before creating an 360° interactive video. After login, you can start working by selecting the video you will add interaction to. Let's look at how we can create an interactive video project.
360° Video Upload
First of all, we upload the video we will use to the system. Select a video for your interactive video project is to upload from your computer to Cinema8.
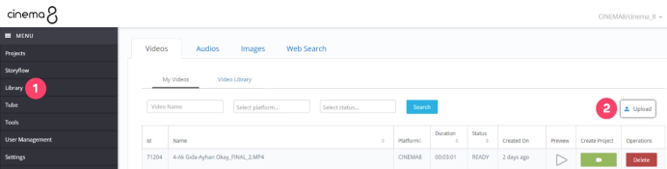
1. Click on the “Library” button from the left panel. My videos list is the area where we can see the videos we have uploaded before.
2. Click the “Upload” button.
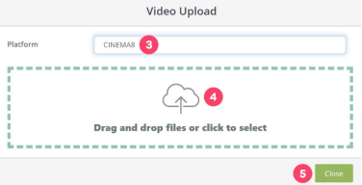
3. By clicking on the field in the popup window, select Cinema8 platform. If you have a synced video account, you can also select them.
4. Click on the field and select your video file to upload from our computer. You can also start the video upload process by dragging and dropping the file into this area.
5. After uploading process is completed successfully, click the “Close” button to close the uploading window.

6. Then, return to the “Library” screen and wait for the video to be processed by the system. The standby time may vary depending on the size of your video.
Your video will be ready to use after processing. All you have to do is to click the “Create Project” button next to your video and to create a project.
Click if you want to look at the project creation screen in detail.
Info: You need to wait a while before the newly uploaded videos to Cinema8 become available. As you can see in the screenshot, the “Create Project” button is not active for a newly uploaded video. When the “Status” of the video is -READY-, your video becomes ready to use and the “Create Project” button is activated.
Create 360° Interactive Video Project
When creating a 360° interactive project in Cinema8, the most important point is to choose the option that indicates that our video is 360 ° on the project creation screen. (Step 11) Let's look at how to create 360° interactive video step by step.
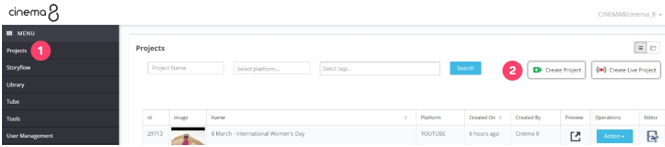
1. Click on the “Projects” button from the left panel. Projects is the area where we can see the interactive video projects we have created before.
2. Click the "Create Project" button to create a new project.
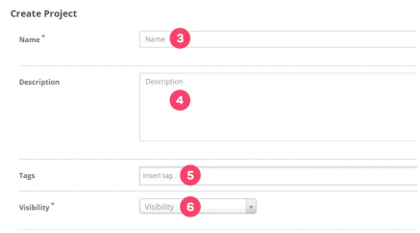
3. Enter the name of the interactive video project.
4. Enter the description of the interactive video project.
5. Enter the tags of the interactive video project.
6. Select the visibility feature of the project.
Public: When you select this option, your video will be available to all users.
Private: When you select this option, you will see two customization options. The first one is the “Password” option. The password entered in this field is now the login password for your video. Anyone who do not have this password will not be able to watch your video. The second one is the “Domain Restriction” option. When you type a URL in this field, your video will only work on that URL.
Unlisted: When you select this option, your video will not appear to all users, only to the user groups you have selected.

Click here to learn how to create user groups.
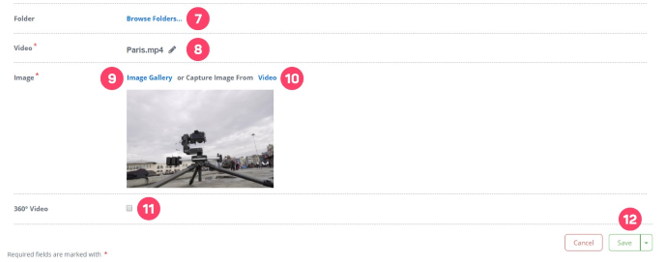
7. Select the folder where the project will be located.
8. You can change the source video of the interactive video.
9. Click on the “Image Gallery” button to select a preview image from the image library.
10. Click on the “Video” button to take a screenshot from the video to select a preview image.
11. Mark this option to make interactive your 360° video.
12. Finally, after completing the required fields, click “Save” to create the project.
Related Articles
How to Use Project History
When you want to change the locations or times of the vehicles you added while creating an interactive project in Cinema8, you may want to take backups first. Because there is always the possibility of deleting an important tool from your project, ...Managing Subtitles in your Interactive Project
Subtitles tool lets you add subtitles to your videos. To add subtitles to your video, your subtitle file must be available in advance. First of all, we click on our vehicle from the Elements list. Here comes the screen where we can upload and edit ...Special Player Design for Videos
With this newly added feature, you can make video player changes according to your company or personal tastes. Edit your video's player colors or icons. Then, assign the player design you have specially prepared to the interactive video you want. It ...A Brief Introduction to 360° Videos
360° videos, which are getting more and more popular nowadays, offer their viewers pleasant experiences. So, what is this 360° video? 360° videos are spherical videos shot with a camera that can record all aspects of the environment in which it is ...Player Settings, How To Customize the Player Bars
Cinema8 allows you to customize the player bars of the interactive videos you have prepared. You can hide the pause button if you want or you can remove the volume button. Who knows, maybe you want to prevent your viewers from rewind or forward ...